How to install your Treon Gateway

Introduction
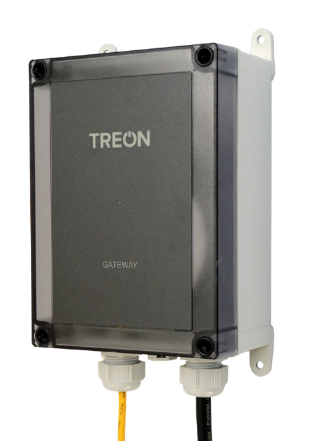
This article will provide step-by-step instructions on how to install the Treon Gateway 2 in Protective Enclosure.
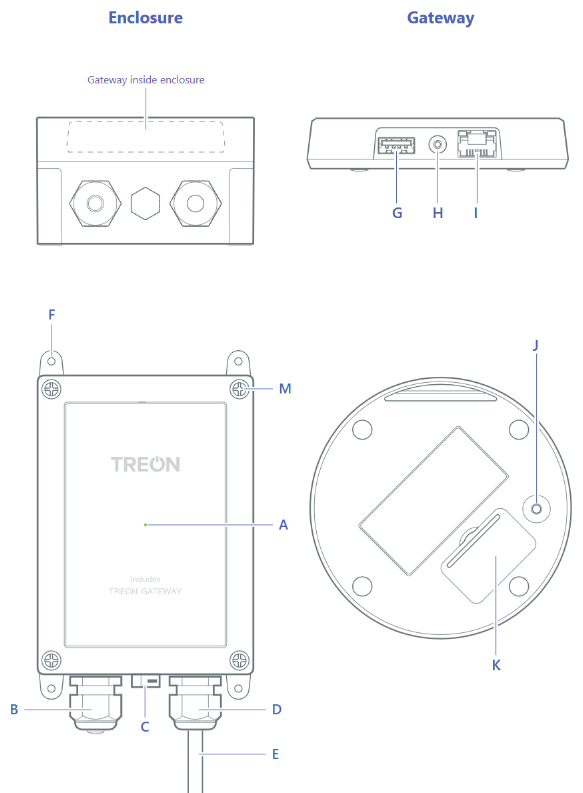
Keys and parts
A. Status light
B. Ethernet cable gland
C. Air vent
D. Power cable gland
E. Power cable
F. Adjustable mounting brackets
G. USB A host port
H. Power cable connector
I. Ethernet cable connector
J. Micro SIM card slot
K. Configuration button
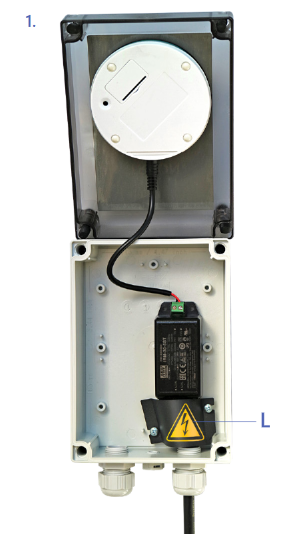
L. Finger guard for power cable (see image in step 1)
M. Lid screws
How to Power up the Treon Gateway
Make sure that the power cable is attached to the Treon Gateway (H) and close the protective enclosure lid. Plug the gateway in a wall outlet.
The gateway switches on automatically. Use only the power supply unit provided together with the product.
Status light (A) colours:
- Green light: The gateway is connected to the internet.
- Blue light: The gateway is trying to establish a connection to the internet.
- Blinking blue: The gateway is in the configuration mode.
- Red light: There’s an error with the gateway or it has no internet connection. Open the configuration mode to see what’s wrong.
How to Mount the Treon Gateway
- Turn the four adjustable mounting brackets (F) outwards.
- Attach the enclosure to the surface with four screws (diameter maximum 4mm). Screws are not included in sales package.
- Ensure that the mains power plug is easily accessible.
AUSTRALIA, NEW ZEALAND. This device should be mounted below 2 meters in height.
How to Open the Treon Gateway’s Enclosure
- Unplug the gateway’s power cable from the wall outlet.
- Unscrew the four screws (M) at the corners of the protective enclosure lid with a suitable screwdriver tool.
- Open the lid carefully. Avoid bending the cable too much as it may damage the device.
Product info
Power supply and cables
Use only the power supply unit provided together with the product. Do not use a USB cable longer than 2 meters with the product.
Operating environment
The product is dust and waterproof and it is designed for outdoor or indoor industrial environment, but it is not intended for continuous submersion. The operating temperature range of the product is from -20 to +50 °C.
The enclosure is rated to IP67.
CERTIFICATION INFORMATION
Manufacturer Treon Oy, Visiokatu 1, 33720 Tampere, Finland.
EU DECLARATION OF CONFORMITY
Hereby, Treon Oy declares that the radio equipment Treon Gateway in Protective Enclosure is in compliance with Directive 2014/53/EU.
This product contains a certified Treon Gateway.
FCC NOTICE
FCC ID: 2AR86GW11
This device complies with Part 15 of the FCC rules. Operation is subject to the following two conditions: (1) this device may not cause harmful interference, and (2) this device must accept any interference received, including interference that may cause undesired operation. Note: This equipment has been tested and found to comply with the limits for a Class B digital device, pursuant to part 15 of the FCC Rules. These limits are designed to provide reasonable protection against harmful interference in a residential installation. This equipment generates, uses and can radiate radio frequency energy and, if not installed and used in accordance with the instructions, may cause harmful interference to radio communications. However, there is no guarantee that interference will not occur in a particular installation. If this equipment does cause harmful interference to radio or television reception, which can be determined by turning the equipment off and on, the user is encouraged to try to correct the interference by one or more of the following measures:
- Reorient or relocate the receiving antenna
- Increase the separation between the equipment and receiver
- Connect the equipment into an outlet on a circuit different from that to which the receiver is connected
- Consult the dealer or an experienced radio/TV technician for help Radiofrequency radiation exposure information: this device complies with the radiation exposure limits prescribed for an uncontrolled environment for fixed and mobile use conditions. This device should be installed and operated with a minimum distance of 20 cm between the device and the body of the user or nearby persons.
Canada
IC: 24716-GW11
This device complies with Industry Canada license-exempt RSS standard(s).
Operation is subject to the following two conditions:
- This device may not cause interference, and
- This device must accept any interference, including interference that may cause undesired operation of the device.
This equipment complies with IC RSS-102 radiation exposure limits set forth for an uncontrolled environment. This equipment should be installed and operated with a minimum distance of 20 cm between the radiator and your body.
This Class B digital apparatus complies with Canadian ICES-003.
Cet appareil est conforme à la(aux) norme(s) RSS sans licence d’Industry Canada.
Son utilisation est soumise aux deux conditions suivantes:
- Cet appareil ne doit pas causer d’interférences et
- il doit accepter toutes interférences reçues, y compris celles susceptibles d’avoir des effets indésirables sur son fonctionnement.
Cet équipement respecte les limites d’exposition aux rayonnements IC RSS-102 définies pour un environnement non contrôlé. Il doit être installé et utilisé en maintenant une distance minimum de 20 cm entre le radiateur et votre corps.
Cet appareil numérique de classe B est conforme à la norme canadienne NMB-003.
Safety guide and Warranty
Usage
Do not cover the device as it prevents the device from operating properly.
Safety distance
Due to radio frequency exposure limits the gateway should be installed and operated with a minimum distance of 20 cm between the device and the body of the user or nearby persons.
Care and maintenance
Handle your device with care. The following suggestions help you keep your device operational.
- Do not open the device other than as instructed in the user guide.
- Unauthorized modifications may damage the device and violate regulations governing radio devices.
- Do not drop, knock, or shake the device. Rough handling can break it.
- Only use a soft, clean, dry cloth to clean the surface of the device. Do not clean the device with solvents, toxic chemicals or strong detergents as they may damage your device and void the warranty.
- Do not paint the device. Paint can prevent proper operation.

Last updated on Dec 9, 2025