Connect your Treon Gateway
Introduction
Your Treon Connect Test Kit gateway typically comes equipped with a SIM card operational in your country.
Additionally, all Treon Gateways can be connected to the the internet via Ethernet connection or Wi-Fi.
Should you want to use a different SIM card than the one provided by Treon, please first check the necessary requirements:
The Treon Gateway is compatible with 2G, LTE M1 and NB-IoT (Narrowband IoT). We do not recommend using NB-IoT due to the low bandwidth that is provided. The Treon Gateway is not compatible with 4G and 5G SIM cards. The SIM card format used is Micro-SIM.
Connection priority
The connection priority determines the order of connection method the Treon Gateway tries to connect in to the network.
The standard settings have the following priority order of connections:
- Ethernet connection
- Cellular (SIM) connection
- Wi-Fi connection.
This means that the Treon Gateways will first try to connect via Ethernet. If no Ethernet connection is available, it will connect via cellular (SIM) connection. If no SIM card is present or the connection cannot be established, the gateway will switch to Wi-Fi connection if one is set up.
You can change the connection priority and other settings in the gateway’s Configuration UI.
1. Ethernet Connection
Treon Gateway & Treon Gateway 2
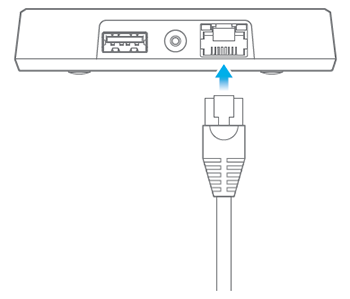
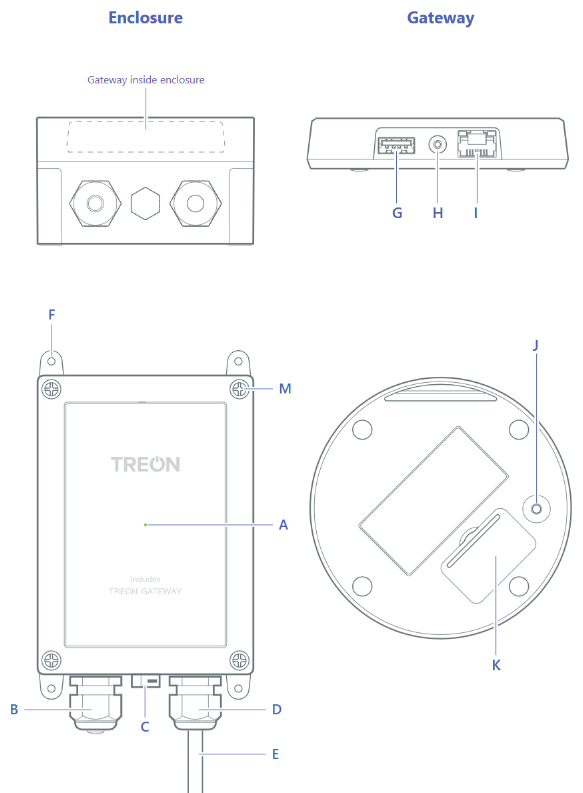
You can establish an Ethernet connection simply by attaching an ethernet cable to the Treon Gateway (item I).
Treon Gateway in Protective Enclosure
For establishing an Ethernet connection with the Treon Gateway in Protective Enclosure, you need to open up the enclosure to gain access. When using a permanent Ethernet connection, you should run the Ethernet cable through the free cable gland in the enclosure (item B).
You can change the ethernet settings in the Configuration UI of the Treon Gateway.
Cellular (SIM) Connection
SIM Card Requirements
The SIM card needs to fulfil the necessary requirements, or it will not work with the Treon Gateway. Choose the mobile network provider and the type of SIM card carefully, so it will work with the gateway.
The Treon Gateway is compatible with 2G and LTE M1.
NB-IoT (Narrowband IoT) is theoretically possible but turned off by default as we do not recommend using it due to the low bandwidth that is provided.
4G and 5G SIM cards are not compatible with the Treon Gateway. If you would like to use a 4G or 5G SIM card, you can use a USB SIM card modem that utilize these connection methods. Please read the segment on External USB modems below.
The SIM card format used is Micro-SIM.
Always make sure that the chosen SIM card provider has sufficient network coverage in the area of deployment. Specifically large amounts of data (e.g. when using raw data or downloading product updates) can be problematic if the mobile network signal strength is poor.
The SIM card is not hot-swappable. This means, that after inserting or switching a SIM card on a running Treon Gateway, you should always reboot the device to ensure that the SIM card is recognised properly.
Please also note that the APN should be autodetected in most cases. If 20 minutes after booting the Treon Gateway it still does not connect, then you will need to change the APN in the Configuration UI.
Treon Gateway & Treon Gateway 2
Unplug the Treon Gateway’s power cable from the wall outlet.
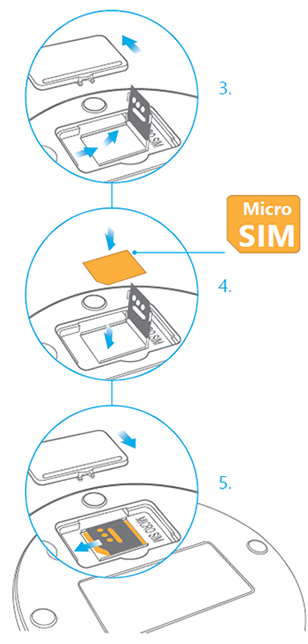
Put your fingernail in the seam between the lid of the SIM card slot (K) and the back cover and remove the lid.
Slide the SIM card holder to the right until it unlocks, and lift the holder up.
Place the micro SIM card in the holder with the contact area face down, and close the holder.
Slide the holder to the left until it locks into place, and put back the lid.
Please note: Always unplug the power from your Treon Gateway before inserting or removing a SIM card! Under certain conditions a hot swap can be possible, but it cannot be guaranteed that it works.
Treon Gateway in Protective Enclosure
- Open the protective enclosure lid.
- Put your fingernail in the seam between the lid of the SIM card slot (K) and the back cover and remove the lid.
- Slide the SIM card holder to the right until it unlocks, and lift the holder up.
- Place the micro SIM card in the holder with the contact area face down, and close the holder.
- Slide the holder to the left until it locks into place, and put back the lid of the SIM card slot.
- Close the protective enclosure lid and tighten the screws.
Please note: Always unplug the power from your Treon Gateway before inserting or removing a SIM card!
External USB SIM-Modem
The Treon Gateway and the Treon Gateway 2 have a USB connection that can be equipped with an external USB SIM modem.
A prerequisite is that the Treon Gateway or Treon Gateway 2 has the correct driver for the specific SIM modem model. The gateways have drivers for many popular models pre-installed, but check with Treon Support if you would like to use a model not included in our list.
When using an USB SIM modem with the Treon Gateway, the modem first needs to be configured on a computer before it can be used on the gateway. It is not possible to configure the USB SIM modem directly from the Treon Gateway.
Drivers are included for:
- Huawei E3372
- ZTE MF833V
- Huawei E3372h-320 LTE
- Alcatel Link Key 4G IK40V
- and other models
Changing the SIM settings
The preferred process is always to change the SIM settings via the Configuration UI.
Please note that the APN should be autodetected in most cases. If 20 minutes after booting the Treon Gateway it still does not connect, then you will need to change the APN in the Configuration UI.
3. Wi-Fi Connection
The Treon Gateway, Treon Gateway 2 and Treon Gateway in Protective Enclosure can establish a network connection via Wi-Fi. Should the installation of an Ethernet cable not be possible at a deployment site, a Wi-Fi connection will be the next best choice.
The Treon Gateway and Treon Gateway 2 use Wi-Fi standards 802.11 b/g/n and are compatible with all 2.4G Wi-Fi networks.
Treon Gateway, Treon Gateway 2, Treon Gateway in Protective Enclosure
In order to establish and configure a Wi-Fi connection, access the Configuration UI and proceed with the steps below.
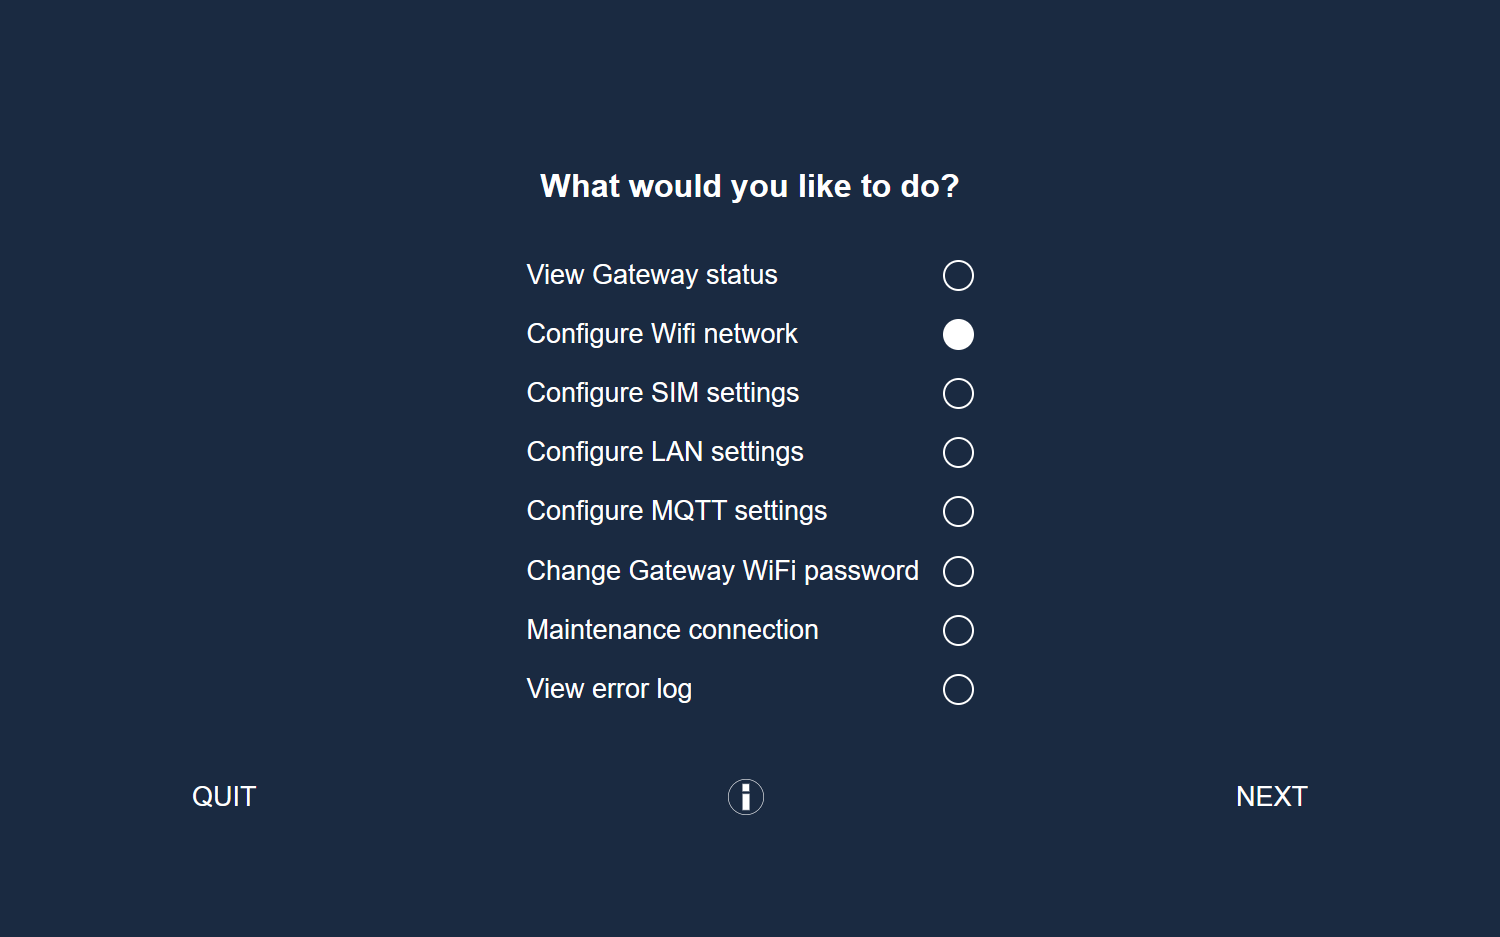
- Choose Configure Wi-Fi network on the main page.
- Choose Add Wi-Fi network and click Next. The Treon Gateway will now search for all existing 2.4G networks.
- Select the Wi-Fi network you would like to connect to.
- Enter the password for the selected Wi-Fi network.
- Now the Treon Gateway will connect automatically to the selected Wi-Fi network. In order to exit the Configuration UI, select Quit, or press and hold the configuration button (F) until the status light stops blinking.
Next step: Connecting the Treon Industrial Nodes

Last updated on Dec 8, 2025